
Today his and her's chairs an upholstering journey......
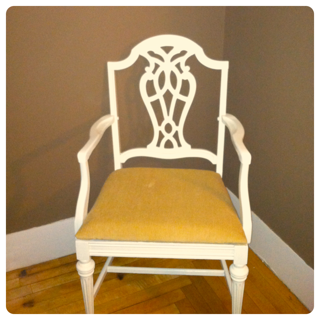
We found these amazing chairs on Saturday and couldn't believe our eyes, 2 chairs for $14! I know what you're thinking are you crazy? These amazing, I think not! But look a little closer, the shape of the chair, arms, and design in the back is practically begging to be returned to something beautiful. I was at first a little disappointed that both chairs weren't identical, but that was until my boyfriend said that they could be his and her chairs for our bedroom, I WAS SOLD!


The first thing I did when I got home was to bring them outside to start looking at them closer and taking them apart so that the rehab journey could begin. Yup I still loved them, at this point probably even more, next Mike decided that we'd paint them antique white (really like I'd oppose lol).
If you are new to painting furniture please remember to follow these steps:
Sand, Wipe off excess dirt, Prime, Paint, Second Coat. Trust me if you skip a step you won't love the finished product as much.
For the upholstering make sure you have the following tools:
Staple Gun
Sharp Scissors
Batting (purchased at Joann)
Foam (1 1/2 or 2 inches should be fine, also purchased at Joann)
Fabric (I purchased 3 yards, but I will use it around the room for other things!)
Spray Adhesive
Patience!
To begin upholstering you want to remove all of the old fabric, I was so excited to rip off this ugly pattern that I could barely contain my excitement, that was until I found another layer of ugly fabric!! Anyways after you have just the wood then you want to start using your own padding that will make for new seating. With your spray adhesive add your foam to the board, then you'll want to wrap your batting around the seat and staple in the back. now you're ready for your fabric!! I started with stapling the middle of every side first because you'll want to make sure your edges are perfect.


Now you're ready for your fabric!! I started with stapling the middle of every side first because you'll want to make sure your edges are perfect. The entire process shouldn't take you longer than 30 minutes and it's worth it, the finished product is just stunning!
Tips:
We found beautiful chenille fabric for $4 a yard at Joann fabric in the red tag section...seriously chenille! Don't skimp on fabric!! I was determined to have an expensive look for a fraction of the price and it worked! P.s. If you have a smart phone make sure you get Joann's free app I saved 50% off my full priced item and 10% off my entire purchase..


CUTE CUTE CUTE.... I will learn to paint as well as you hopefully one day
ReplyDeleteYOU can do it! Seriously follow the steps I listed above when it comes to painting your furniture and remember practice makes perfect!
Delete